And a project like that wouldn't even be inauthentic: there have been several waves of orientalism during the 18th and 19th century, the late 18th century Robe à la Turque being one of the resulting fashion trends. I however preferred to go more towards the late bustle era, because
1) I've made several 18th century style dresses now: a Chemise dress, a regular Robe à l'Anglaise, a zone-front Anglaise, and a Robe à la Francaise...time for a new time period!
2) I wish I could insert more profoundly researched reasoning about victorian orientalism and imperialism here, but: I like bustles -
- Bustles have lots of draping
- Indian Sarees are drapey, too!
- Embroidered sarees are gorgeous!
- Indian vintage sarees are dead cheap on ebay
- Therefore: saree bustle, here I come!
While looking for inspiration, I also came across the Duchess of Devonshire's Diamond Jubilee costume ball in 1897: The british high society assembled and dressed up as characters from history, literature, art and mythology, everything documented by photographers (so basically, just like today). Most costumes were exclusively made by haute couture designers like the House of Worth and some of them have survived until today. Especially the mythologically inspired dressed caught my eye: the hostess herself dressed up as Zenobia, Queen of Palmyra, the green embroidered dress reminds me a little of peacocks.
A nice collection of portraits from the ball can be found in this blog, including some analysis about the costumes.
So, anyway, I went on ebay and ordered 2 sarees, a red one and a plainer black one, and then I started working!
 |
| One of my sarees, before I cut it up - gorgeously embroidered! |
Step 1: new underwear!
Of course I have dozens of victorian corsets, but none of them are really suitable for underwear, and I also needed a bustle.
While making the corset, I discovered one of the advantages of living in a large city now: I can spontaneously go to the store and buy a corset clasp, without having to order online, imagine that!

I found the lobster bustle pattern on American Duchess, while the corset pattern is probably my 5th Laughing Moon Silverado corset - it just fits comfortably and results in a nice silhouette. I made it from 2 layers of floral and herringbone coutil and a mix of spiral steel and flat steel boning - business as usual and nothing special.
 |
| Finished - lobster bustle and corset |
Step 2: Foundation skirt
The black saree that I ordered as well got cut up first and I made a basic foundation skirt from it. The nice thing about working with sarees: they're already hemmed and this one even has some sort of facing on the hem, so it doesn't get damaged as easily. Amazing stuff for a lazy seamstress!

I actually intended to also make an additional cotton petticoat to go under it - but the flu and a family emergency got the better of me, so I didn't have enough time in the end.
Step 3: Drapery
This is where my lovely red saree went: The Truly Victorian 374 pattern for an asymmetrical overskirt was just perfect, since it allowed me to make full use of the beautifully embroidered border of the saree. It came together easily and nicely and I was glad that the saree silk was so light: in the back, lots of fabric had to go into little pleats, which would have been quite annoying with a heavy fabric!
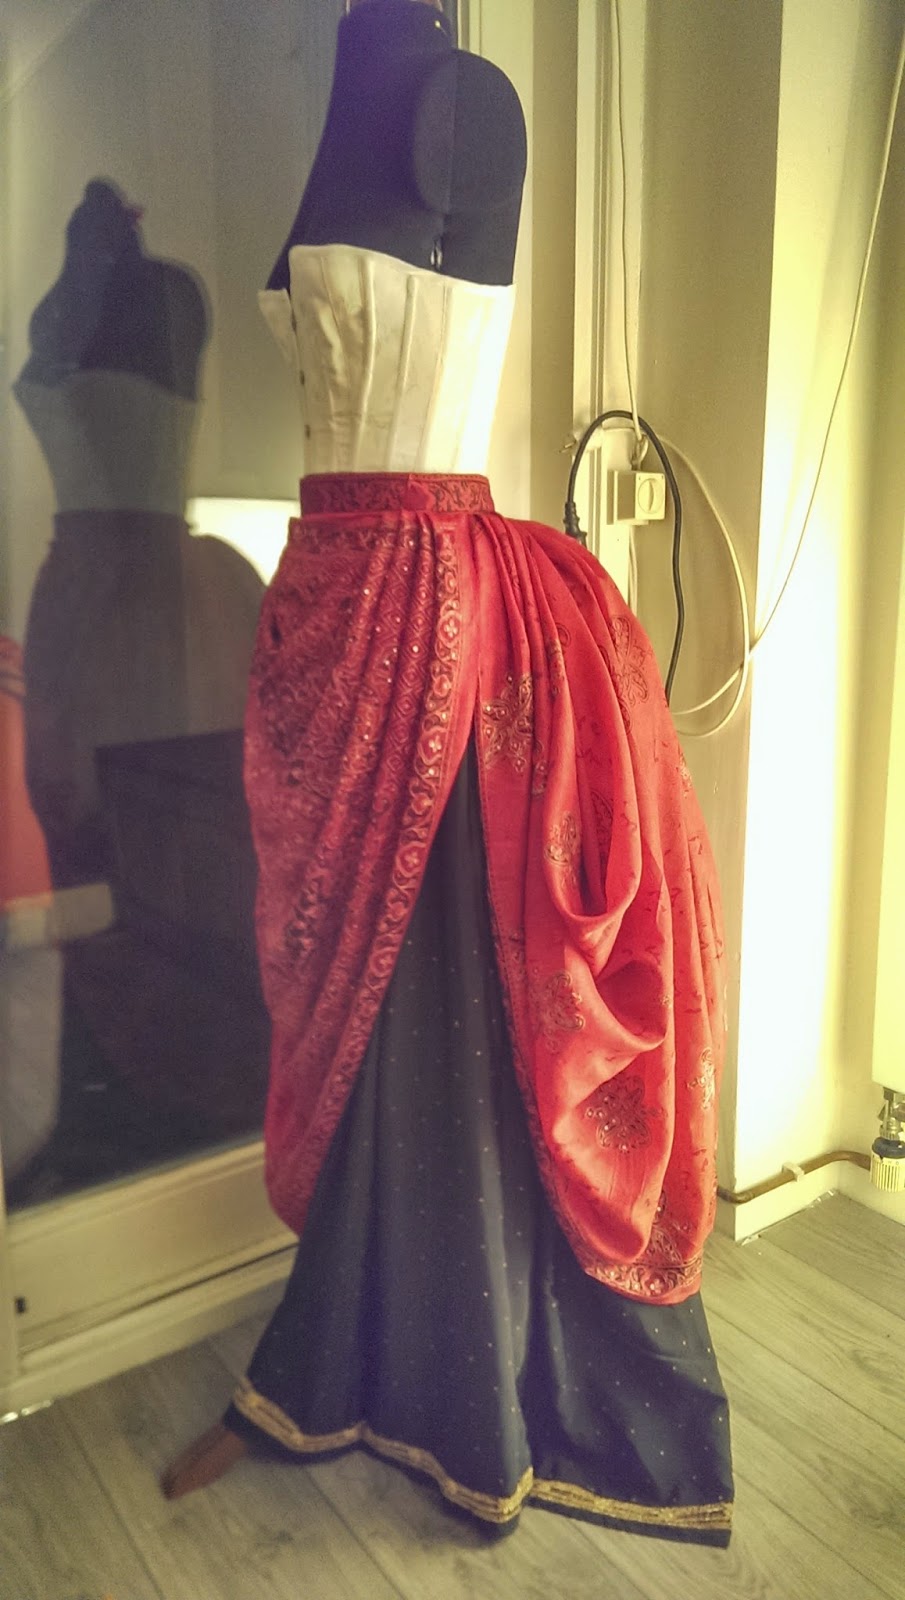
I used the Pallu, the pretty embroidered front part for the front part of the drapery - I love how all of the pleats are falling, the TV sewing pattern is really amazing!
Step 4: Bodice
This was the part that I was a little afraid of: I had to modify the bodice pattern a little, since I wanted it to be closed in the back instead of the front. Also, I wanted it to fit perfectly over the corset to show off my corsetted waist :) . But once again I had the luck of fitting into the sewing pattern almost without any modifications, only for the sleeves I should have taken a little more width. They are designed to be off-the-shoulder, but for comfort it would have been nice to have them more closely fitting.

All in all, the bodice is made from 4 layers: Saree fabric, fusible interfacing, interfacing and lining, plus 12 steel bones to make sure the fabric lies smoothly.
Once the bodice itself was finished, I hemmed what was left of the red saree, folded it up and hand-stitched it to the bodice. I had originally planned for a more sophisticated drapery here, but in the end I stuck more closely to how actual sarees are worn - and I quite like it!


.jpg) |
| This was the first project where I used piping - gives it a so much cleaner look! |
I finished it just in time for this year's Gala Nocturna (and by "just in time", this time I don't even mean "had to hand-stitch the rest on the train", but "the evening before", I guess my planning is getting better)) - but I'll write extensively about our trip to Brussels in the next blog post!
Gorgeous looking dress.... it was worth the effort!
ReplyDeleteOh my gosh, that is positively gorgeous!
ReplyDeleteThis is incredible! Thanks for sharing all the details like the patterns you used, this is quite helpful. I think I need to buy the TV overskirt pattern, it looks great here!
ReplyDelete